
This is the usage manual for the free NixieFX editor. It documents what every screen, module, and field actually does. For a capability overview of the whole system — runtime integration, the export bundle format, agent skills — see the feature reference. Effects are plain JSON files in a folder on your computer; the editor never uploads anything.
Getting started
Browser requirements
The editor runs at nixiefx.com/editor/ with no install and no account. It reads and writes real folders on your computer through the browser's File System Access API, which today ships in Chromium-based browsers: Chrome, Edge, Arc, Brave, or Opera. In Safari or Firefox the editor shows a full-screen notice ("Reading and writing local folders needs the File System Access API, which this browser does not support yet") instead of the launcher.
Nothing is uploaded. Projects are ordinary folders; the browser asks for read/write permission per folder, and the launcher footer states it plainly: "Your folders stay on your computer · nothing is uploaded."
The launcher
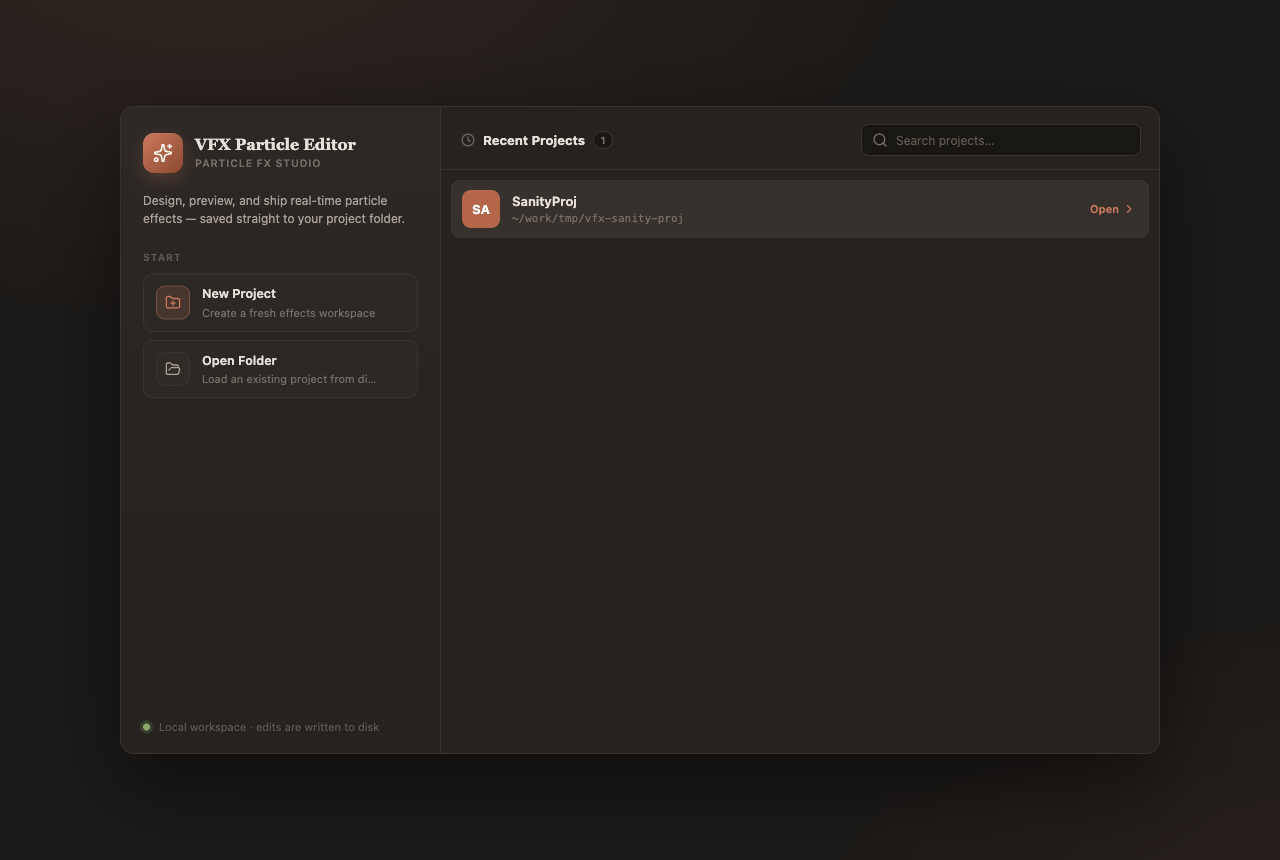
When no project is open, the launcher offers:
| Card | What it does |
|---|---|
| New Project |
Opens the OS folder picker ("Pick a folder for a fresh
effects workspace"). The editor writes a
vfx-editor.prj file and a starter effect into
the folder you choose. If the folder already contains a
project, it simply opens it.
|
| Open Folder |
Opens the OS folder picker for an existing project. If the
picked folder has no vfx-editor.prj, the
editor asks: "<folder>" does not contain a VFX
project. Create one in this folder?
|
| Try the Playground | A ready-made sandbox project in a folder you pick — see below. Web build only. |
| Recent Projects | Up to 30 recently opened projects (most recent first) with a search box. Click a row to reopen it. Recents are stored in browser storage; the project files themselves stay on disk. |
The playground
The playground is a real project folder on disk, not a browser sandbox, so everything you author there is saved as normal files a game can load. The first click walks you through setup:
- A dialog explains the plan ("Set up your playground") and asks you to pick an empty folder. The playground project is copied into it, and the browser asks permission to access the folder.
- If the folder you pick is not empty, the editor refuses — "The playground needs an empty folder so it can never overwrite anything of yours." — and offers to pick another.
- If the folder already contains a VFX project, the editor offers to adopt it as your playground instead ("Project found — use it as your playground?").
After setup the playground folder is remembered. On later visits the same card reopens it directly. Two recovery flows are built in:
- Permission expired — browsers periodically drop folder permissions. The editor shows "Folder access needed" and re-asks until you grant access or cancel.
- Folder deleted or emptied — if the remembered folder no longer contains a project, setup starts over from step 1.
If you used an older NixieFX build whose playground lived purely in browser storage, its contents are copied into the disk folder you pick, so nothing you authored is lost.
Interface tour
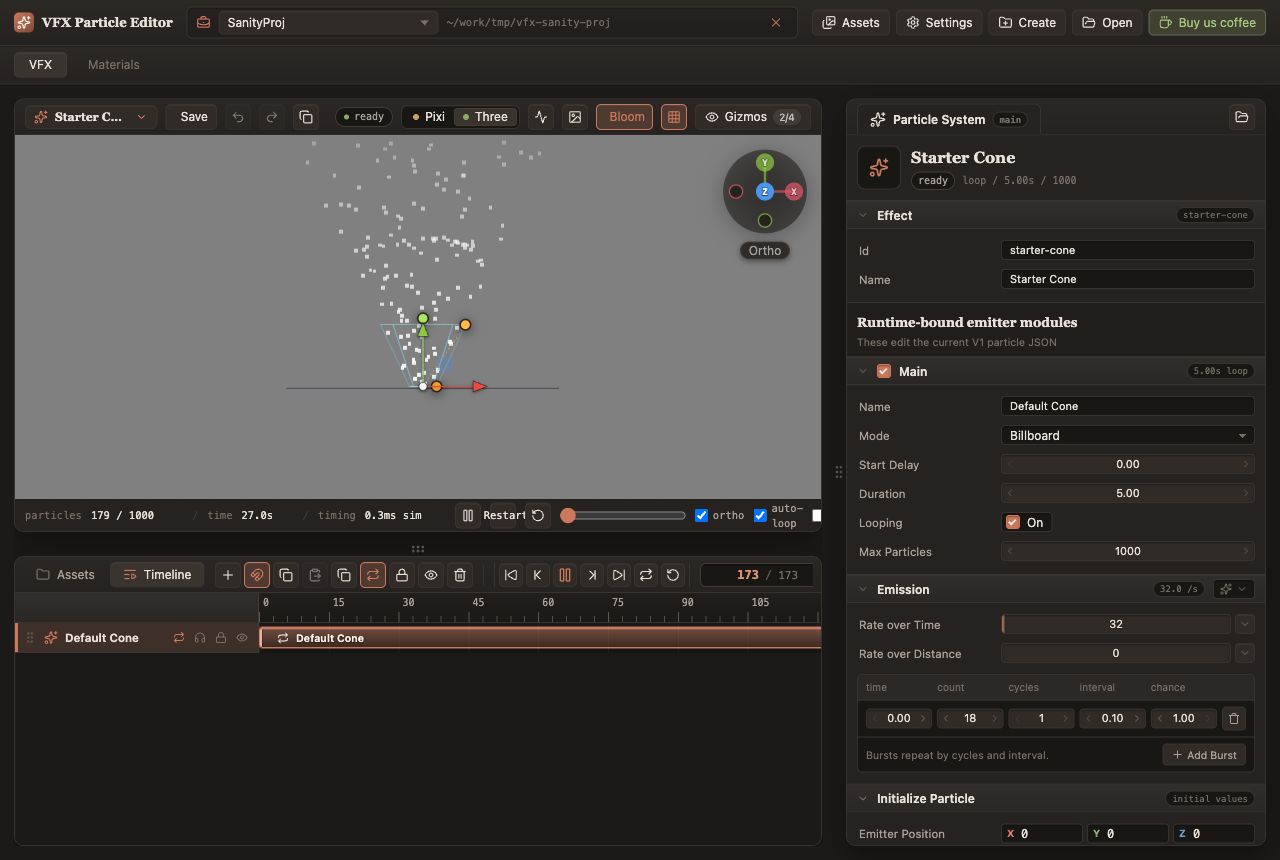
Top bar
| Control | What it does |
|---|---|
| Project switcher |
A dropdown of every known project, with the active
project's path shown next to it (your home folder is
abbreviated to ~). The
× button closes the active project and
returns to the launcher, confirming first if there are
unsaved changes.
|
| Assets | Switches the bottom workspace to the Assets tab. |
| Settings | Opens the Project Settings dialog. |
| Create | With a project open, creates a new effect in the project (tooltip: "Create a new effect in this project"). The new effect is seeded from the Starter Cone template, named "New Particle Effect", and the effects library opens with the name ready to rename. If the current effect has unsaved changes you are asked to discard them first. |
| Open | Opens another project folder (OS folder picker). |
| Buy us coffee | Opens the optional donation dialog. |
Tool tabs: VFX and Materials
Below the top bar, two tool tabs switch the whole workspace: VFX (the particle editor) and Materials (the shader graph editor). A dot appears on the Materials tab while the open material has unsaved changes. Switching into Materials while the current effect is dirty prompts to discard; switching back never prompts, because material work is continuously auto-preserved in a per-project scratch slot. The chosen tab is remembered between sessions.
Viewport toolbar
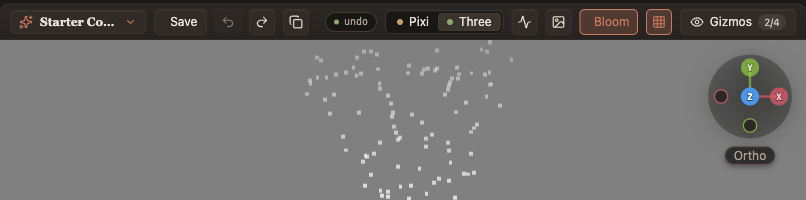
| Control | What it does |
|---|---|
| Effects library | The effect-name button opens the effects library popover: a + New effect button, a "Search effects…" filter, and one row per effect JSON in the project with inline Rename and Delete buttons. A dot on the button marks unsaved changes. Selecting another effect prompts to discard unsaved work first. |
| Save | Writes the current effect JSON to the project (Ctrl/Cmd + S). |
| Undo / Redo | Effect-level history (Ctrl/Cmd + Z, Ctrl/Cmd + Shift + Z or Ctrl/Cmd + Y). |
| Duplicate | Duplicates the current effect as "<name> Copy" and switches to it. |
| Status pill |
The current editor status: ready,
edited, saved,
exported, and similar.
|
| Pixi / Three toggle | Switches the preview renderer and the effect's target profile (see Preview & backends). Each button carries a support dot colored by that backend's live support status — supported, partial, or blocked — and the tooltip names the first blocker or warning. |
| Preview diagnostics | Toggles a stats overlay: fps, frame / update / sim / draw milliseconds, effect and particle counts, visible and emitted counts, sub-emitter spawns, render groups, upload bytes, and bloom activity. |
| Preview background |
Popover with a background Color (default
#808080), an optional
Image texture on top of the color, and a
Lock image toggle. On the Pixi backend the
image can be dragged and resized on-canvas (hold
Shift while resizing to
stretch freely); the Three backend does not draw the image.
Preview-only, never exported.
|
| Bloom | Preview-only HDR bloom — see Preview bloom. |
| Floor grid | Toggles the 3D floor grid. Three backend only; on Pixi the button is disabled ("Floor grid is available in the Three 3D backend"). |
| Gizmos | A menu of per-gizmo visibility checkboxes with a visible/total count — see Gizmos. |
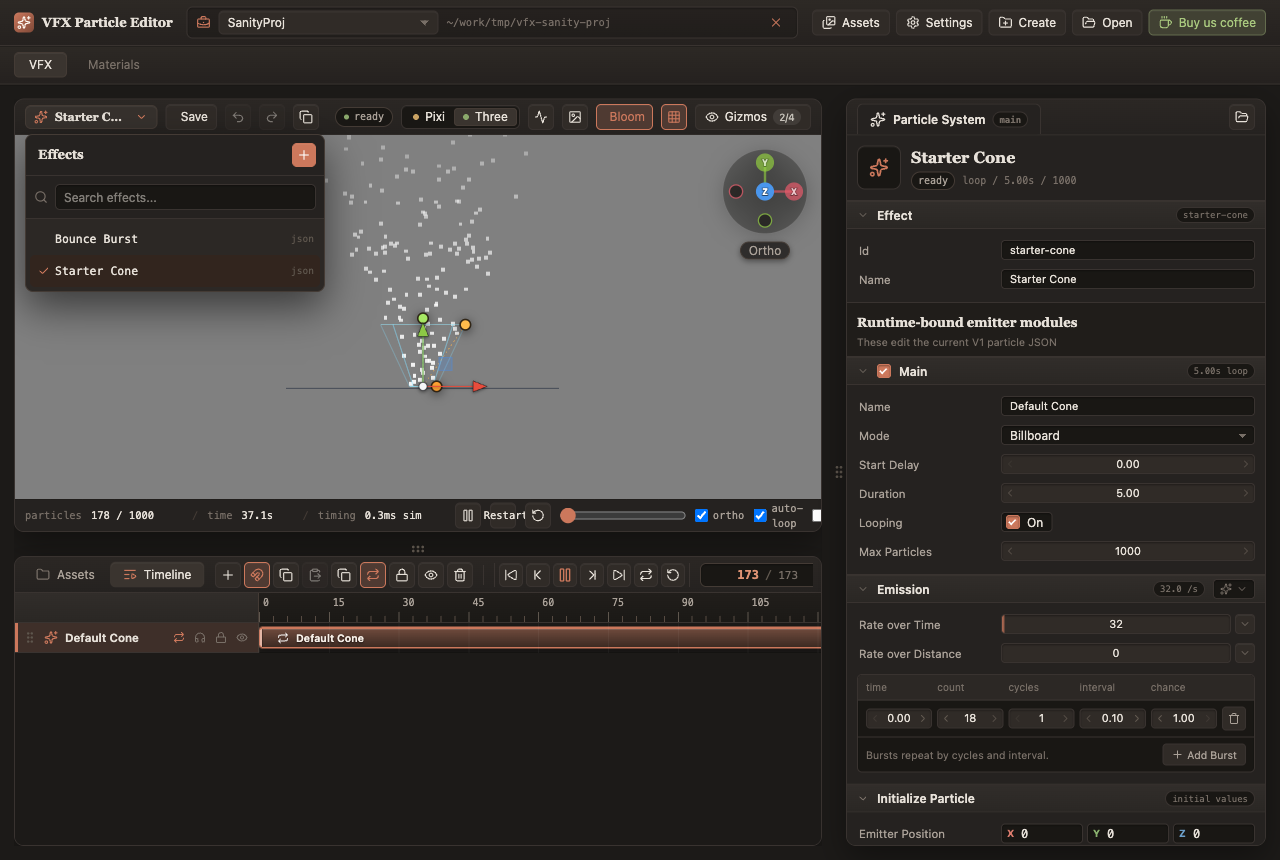
Viewport footer
The strip under the viewport shows live readouts and playback controls:
- particles — active particle count over total capacity; time — preview time in seconds; timing — simulation milliseconds (hover for frame / update / draw ms and fps).
- Play/Pause and Restart — pause freezes the simulation; Restart replays from time 0. By default each restart picks a fresh random seed; see lock seed below.
- Reset view — restores the default camera (double-clicking the viewport does the same).
- Zoom slider — camera zoom, 0.45×–2.5×.
- ortho — orthographic camera toggle (on by default).
- auto-loop — when a one-shot effect finishes (all emitters done, all particles gone), the preview automatically restarts. On by default.
- lock seed — keep the same random seed on every replay for bit-identical repetition. Off by default, so replays vary. Scrubbing and seeking never reseed regardless of this toggle.
- FOV slider — perspective field of view, 8–65 degrees; disabled while the camera is orthographic.
Bottom workspace and inspector
The bottom panel has two tabs — Assets and Timeline — that share a single toolbar row. Both stay mounted, so switching tabs never loses state. Drag the handle above the panel to resize it (220–520 px; double-click resets). The right-hand inspector panel hosts the emitter modules and the Validation & Export panel; its width is also draggable (320–640 px).
Projects and files
A NixieFX project is any folder containing a
vfx-editor.prj settings file. Effects are plain JSON
files — the editable source of truth — and everything the editor
writes stays inside the project folder:
project/
  vfx-editor.prj        # project settings (paths below)
  *.json                # effect files (source of truth)
  materials/*.material  # shader graphs (JSON)
  ...textures, meshes   # any folder layout you like
  out/vfx/              # exported game bundle (read-only in the editor)
Project Settings dialog
Top bar → Settings. Each row shows a Default/Custom pill; paths are project-relative.
| Setting | Default | What it controls |
|---|---|---|
| Effect Data | . |
The folder scanned for effect .json files. It
becomes the effects root in the Assets browser and the
source root for export.
|
| Export Output | out/vfx |
Where Export Game VFX writes the game bundle. Also appears in the Assets browser as the read-only "Export Output" root. |
| Allow External Output | off | When enabled, the output path may point outside the project root ("External paths allowed" vs "Project-relative only"). |
| Asset Root | . |
The base folder for texture and mesh references. Export copies referenced assets relative to it. |
| Materials Folder | materials |
The sub-folder of the asset root where
.material files live and are discovered.
|
| Project File | — |
Read-only: the location of vfx-editor.prj,
which owns all of these paths.
|
With the default settings (Effect Data and Asset Root both
.) the Assets browser shows two roots —
Project Files and Export Output.
When the two paths differ it shows three: Particle Effects,
Assets, and Export Output. Export Output is always read-only.
The Assets browser
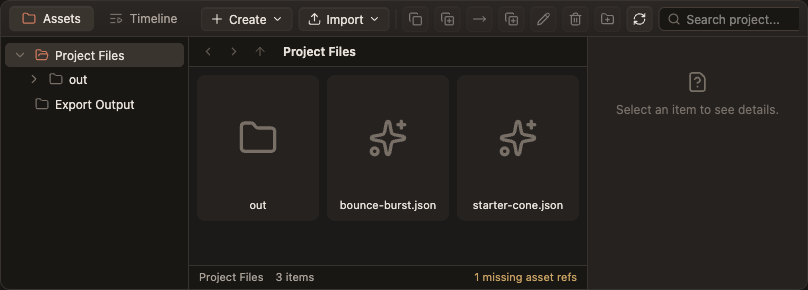
The Assets tab is a three-pane file manager: a folder tree on the left, the file view in the middle (with breadcrumbs and a status bar), and a details inspector on the right.
Toolbar
- Create menu — New Folder, New Particle Effect, New Material, and a "From Template" section with the effect templates Impact Burst, Ambient Sparks, and Smoke Puff. New effects and folders drop straight into inline rename; new effects open in the editor immediately.
- Import menu — Import Texture, Import Mesh, Import Effect JSON (multi-select file dialogs).
- File actions — Copy, Paste, Move, Duplicate, Rename, Delete, Reveal in Finder (desktop dev build only), Refresh.
- A recursive search box ("Search project...") that matches names and paths across the whole current root.
- Sort menu — Name, Type, Size, Date modified; Ascending / Descending. Folders always list first.
- List view / Grid view toggle. Both persist across sessions.
Navigation and selection
- Back / Forward buttons walk a real history stack; "Up one folder" and clickable breadcrumbs move within the tree.
- Multi-select with Ctrl/Cmd + click (toggle), Shift + click (range), or a rubber-band marquee drag on empty space. Arrow keys, Home/End, PageUp/PageDown and type-ahead work in the file view — see Keyboard shortcuts.
- Double-click behavior by type: folders navigate; particle effects open in the VFX editor; materials open in the Material editor; textures and meshes just select.
- Texture files show live image thumbnails in both views; effects show a spark icon, materials a palette icon, meshes a box icon.
Drag and drop
- Move — drag entries onto a folder card, a tree row, or a breadcrumb. Invalid drops (same folder, folder into itself) are refused with a reason. The Move... action opens a destination-picker dialog for the same operation.
-
Import from the OS — drop files anywhere on the
browser: images become textures,
.glb/.gltfbecome meshes, and.jsonimports as an effect (or a mesh when dropped in the assets root). The overlay reads "Drop textures, meshes, or effect JSON to import". - Dragging a single texture or mesh onto a texture/mesh field in the inspector assigns it there.
Context menu
Right-click an entry (or empty space) for: New Folder, New Particle Effect, New Material, Import Texture / Mesh / Effect JSON, Open, Export Game VFX (on effect files — exports just that effect), Rename, Copy, Paste, Move..., Duplicate, Delete, Reveal in Finder (desktop only), and Refresh.
Details pane and missing references
- Textures — preview, path, type, size, modified date, a reference count, and a "Referenced by" list of the effects and emitters using the texture ("Unused by saved effects" when none).
-
Effects — file, emitter count,
modified date, and a validation pill. The open effect shows its
live validation summary ("Valid" or "N errors, N warnings") plus
an
open/open (unsaved)badge; other effects show "Open to validate". - Materials — file, node count, modified date.
- The status bar shows the current location, the item and selection counts, and — when any saved effect references a file that no longer resolves — a warning counter like "2 missing asset refs".
Authoring particle effects
An effect is a set of emitters; each emitter is configured through a fixed stack of modules in the right-hand inspector. Select an emitter by clicking its track in the timeline; add one with the + button in the timeline toolbar (or the "Add emitter" button shown when an effect has none). The inspector starts with a locked Effect section (effect Id and Name), then the emitter modules in two groups: "Runtime-bound emitter modules" and "Extended emitter modules", and ends with Validation & Export.
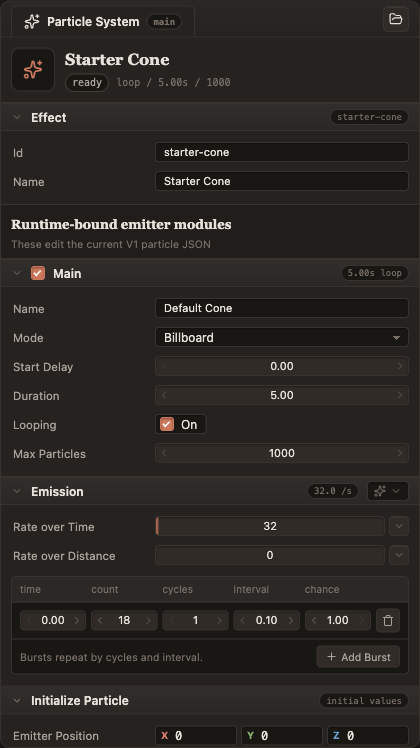
Module conventions
- Every module is a collapsible section. Optional modules have an enable checkbox in the header; structural modules (Initialize Particle, Shape, Renderer, Emission) are always on. Collapse state is remembered per module. There is no "add module" picker — the stack is fixed, and modules are turned on with their checkbox. The one exception is Shader Custom Data, which hides behind a + Shader Custom Data (advanced) button until enabled.
- Some modules have a recipe menu (sparkles button, "Apply a module recipe") with one-click presets; recipes may adjust related modules too (an Emission recipe also sets duration, shape, and start speed).
- Number fields are Blender-style: drag to scrub, click to type, arrow keys nudge by one step, hold Shift while dragging for 0.1× fine control. Bounded values render as filled sliders; unbounded ones as steppers with ‹ › arrows. Booleans are On/Off toggles.
- Backend-specific behavior is called out in inline notes under the affected field (for example "Three pins the alignment axis in 3D. Pixi uses a projected 2.5D approximation.").
Value modes
Most scalar fields accept more than a constant. The chevron next to the field ("Value mode") opens a menu:
| Mode | Behavior |
|---|---|
| Constant | One fixed value. |
| Random Between Two Constants | Two stacked inputs (min, max); each particle samples a uniform random value between them. The pair cross-clamps so min never exceeds max. |
| Curve | A curve sampled over the chosen x-axis. The field shows a curve thumbnail; clicking it opens the curve editor. |
| Random Between Two Curves | Two curves (A and B); each particle samples between them. |
The same menu always ends with a Curve Range row — two numbers setting the curve editor's vertical range for this field.
Module reference
- Main
- Emission
- Initialize Particle
- Shape
- Forces (Gravity & Drag)
- Velocity over Lifetime
- Color over Lifetime
- Size over Lifetime
- Rotation over Lifetime
- Renderer
- Limit Velocity over Lifetime
- Inherit Velocity
- Lifetime by Emitter Speed
- Force over Lifetime
- Color by Speed
- Size by Speed
- Rotation by Speed
- External Forces
- Noise
- Plane Collision
- Triggers
- Sub Emitters
- Texture Sheet Animation
- Particle History Trails
- Shader Custom Data
Main
The module checkbox here enables or disables the whole emitter.
| Field | Control | Default | Notes |
|---|---|---|---|
| Name | text | Emitter | Also editable inline on the timeline track. |
| Mode | Billboard · 2D shard mesh (Pixi) · Mesh particle (3D) | Billboard | "Mesh particle (3D)" is offered only while the effect targets the Three backend. Shards render as flat 2D geometry; mesh particles need a prepared mesh asset and are Three-only. |
| Start Delay | stepper, seconds | 0 | Min 0, step 0.05. The same value as the emitter's timeline clip position; read-only while the track is locked. |
| Duration | stepper, seconds | 1 | Min 0.05, step 0.05. Equals the clip length. |
| Looping | toggle | On | Looping emitters draw ghost repeats on the timeline. |
| Max Particles | stepper | 128 | 1–4096. Per-emitter capacity cap. |
Emission
Always on (dims with the emitter). Recipes: Steady, Burst, Aura, Trail.
| Field | Control | Default | Notes |
|---|---|---|---|
| Rate over Time | scalar (constant / random / curve) | 24 | Particles per second, 0–3000. |
| Rate over Distance | scalar | 0 | Particles per world unit moved, 0–1000 — for trails behind moving effects. |
| Bursts | table | none | Columns: time (0–60 s), count (1–4096), cycles (1–256), interval (0–60 s), chance (0–1). "Add Burst" appends a row (count 16, cycles 1, interval 0.1, chance 1); up to 16 rows. Bursts repeat by cycles and interval. |
Initialize Particle
Always on. The single source of every particle's initial state.
| Field | Control | Default | Notes |
|---|---|---|---|
| Emitter Position | vector X/Y/Z | 0, 0, 0 | World-space spawn origin, ±100. Also draggable with the on-screen move gizmo. |
| Lifetime | scalar, seconds | 1 | Min 0.02 s. |
| Start Color Mode | Constant · Random Between Two · Gradient (by seed) · Random Between Gradients | Constant | The gradient modes sample gradients stored in the effect JSON; the inspector currently exposes swatch editing only for the first two modes. |
| Start Color / Start Color B | color swatch | #FFFFFF | B appears in "Random Between Two" mode. |
| Initial Alpha | slider | 1 | 0–1. |
| 3D Start Size / Start Size | toggle + scalar (or X/Y/Z row) | off / 1 | Billboard emitters. Enabling 3D Start Size splits the scalar into per-axis values. Mesh emitters show Start Scale (X/Y/Z) instead. |
| 3D Start Rotation / Start Rotation | toggle + scalar (or X/Y/Z row), degrees | off / 0 | Displayed in degrees (stored radians). Mesh emitters always show the three-axis row. |
| Start Velocity Mode | Shape Direction · Vector | Shape Direction | — |
| Start Speed | scalar, units/s | 0 | Shape Direction mode: speed along the emission shape's direction. |
| Min Velocity / Max Velocity | vector X/Y/Z, units/s | 0, 0, 0 | Vector mode: a per-axis random range. |
Shape
Always on. Fields appear per shape.
| Field | Control | Default | Applies to |
|---|---|---|---|
| Shape | Point · Circle · Box · Cone · Sphere · Hemisphere · Mesh | Point | — |
| Simulation Space | World · Local | World | All shapes. World keeps live particles where they spawned when the emitter moves; Local keeps them attached to the emitter transform. |
| Angle | stepper, 0–90° | 25 | Cone. |
| Radius | scalar, world units | 0 | Circle, cone, sphere, hemisphere. |
| Radius Thickness | slider 0–1 | 1 | Same shapes. 0 emits from the shell, 1 from the full volume. |
| Arc | stepper, 0–360° | 360 | Circle, cone, sphere, hemisphere. |
| Arc Mode | Random · Loop · Ping Pong · Burst Spread | Random | Same shapes. |
| Spread | slider 0–1 | 0 | Same shapes; snaps emission around the arc. |
| Arc Speed | scalar, ±360 °/s | 0 | Only when Arc Mode is Loop or Ping Pong. |
| Box Size | vector X/Y/Z, 0–48 | 0, 0, 0 | Box. |
| Emit From | Base · Volume | Base | Cone. Volume adds a Length field (default 5). |
| Emission Mesh | mesh asset picker | none | Mesh shape. Paired with Emit From: Surface (area-weighted points across triangles) or Vertices. Spawn direction follows the surface normal. Three backend only; Pixi falls back to point emission. |
| Rotation / Scale | vectors | 0,0,0 / 1,1,1 | All shapes; orients and scales the shape itself. |
| Randomize Direction | slider 0–1 | 0 | All shapes; blends toward a random direction. |
| Spherize Direction | slider 0–1 | 0 | All shapes; blends toward outward-from-center. |
| Randomize Position | stepper, 0–24 units | 0 | All shapes; random offset after shape placement. |
Forces (Gravity & Drag)
Optional. Initial velocity is set in Initialize Particle; this module applies gravity and drag over the particle's age.
| Field | Control | Default | Notes |
|---|---|---|---|
| Gravity Modifier | scalar (signed) | 0 | Multiplier on world gravity. |
| Drag | scalar | 0 | Velocity damping per second, min 0. |
Velocity over Lifetime
Optional. Adds linear, orbital, and radial velocity over the particle's age — computed analytically, so motion is deterministic and identical on both backends.
| Field | Control | Default | Notes |
|---|---|---|---|
| Space | Local · World | Local | Local rotates/orbits around the emitter; World uses world axes and the spawn origin. |
| Linear | X/Y/Z scalar row, units/s | 0 | Each axis supports constant / random / curve. |
| Orbital | X/Y/Z scalar row, rad/s | 0 | Angular velocity around each axis. |
| Orbital Offset | X/Y/Z scalar row, units | 0 | Moves the orbit center. |
| Radial | scalar, units/s | 0 | Outward (or inward, negative) from the center. |
| Speed Modifier | scalar 0–4 | 1 | Multiplies the final velocity. |
Color over Lifetime
Optional. Recipes: White, Fire, Smoke, Magic.
| Field | Control | Default | Notes |
|---|---|---|---|
| Color | gradient | white → white | Sampled over normalized age and multiplied onto the particle's start color. |
| Emissive Intensity | scalar, exposure stops | 0 | 0 is neutral, +1 doubles brightness, −1 halves it. The slider spans ±10 stops; typed values can go further (hard cap 50). Preserved linearly in export for the game's own HDR/bloom pipeline. |
Size over Lifetime
Optional. Recipes: Constant, Shrink, Grow, Pop.
| Field | Control | Default | Notes |
|---|---|---|---|
| Billboard Separate Axes | toggle | off | Off: one Billboard Size value (0.001–24 world units). On: separate Billboard Size X / Y curves. |
| Billboard Softness | slider 0–1 | 0.4 | Soft-edge falloff of the procedural billboard. |
| Mesh Separate Axes / Mesh Size | toggle + scalar (or X/Y/Z) | off / 0.28 | Size for mesh-mode particles, 0.001–24. |
| Mesh Thickness | stepper 0.02–4 | 0.5 | Extrusion depth of 2D shard meshes. |
Rotation over Lifetime
Optional. Controls only over-life spin — Start Rotation (from Initialize Particle) always sets the initial angle. Recipes: Still, Random, Spin, Tumble.
| Field | Control | Default | Notes |
|---|---|---|---|
| Separate Axes | toggle | off | Splits spin into X/Y/Z (Unity-style). |
| Angular Velocity | scalar (or X/Y/Z row), °/s | 0 | Displayed in degrees per second (stored radians). |
Renderer
Always on; starts collapsed. Recipes: Glow, Sprite, Smoke, Shards. The badge reads "textured" once a texture is assigned, otherwise "<mode> / <blend>".
| Field | Control | Default | Notes |
|---|---|---|---|
| Surface | Texture | Material radio | Texture, none | An emitter draws through a texture or a material, never both. Texture mode opens the texture picker; Material mode selects "Sprite Master (built-in)" or any project material and shows the MainTex override plus instance parameters — see binding a material. |
| Blend Mode | Alpha · Additive · Premultiplied Alpha | Alpha | Dimmed with a "Driven by material." note when a custom material is assigned — Masked and Opaque blending are material settings. |
| Shading | Unlit · Lit (Three 3D) | Unlit | Lit reacts to the Three preview scene lights; Pixi keeps unlit compositing and reports a warning. |
| Alignment | Screen · Current Velocity · Spawn Direction · Fixed Vector | Screen | Which local axis the billboard pins. Fixed Vector adds an Alignment Vector field (default 0, 1, 0). |
| Facing | Camera Plane · Camera Position · Off | Camera Plane | Whether the aligned billboard spins around its pinned axis to face the camera. |
| Opacity Source | Texture Alpha · Red · Green · Blue · Luminance · Inverse Luminance · Constant | Texture Alpha | Derives per-pixel alpha from a texture channel so RGB-only textures can alpha-blend. Non-default choices add an Invert Opacity toggle. Dimmed when a material drives the surface. |
| Mesh Asset | mesh picker + Flip Winding + Recompute Normals | none / off / off | Mesh particle (3D) mode only. |
| Mesh Template | Triangle shard · Quad shard · Shard | Triangle shard | 2D shard mesh mode only. |
| Billboard Pivot / Mesh Pivot | vector, ±2 | 0, 0 | Signed pivot offset as a fraction of size; negative values allowed. |
| Depth Test | toggle | on | Three uses the real GPU depth buffer; Pixi approximates with deterministic 2.5D draw ordering and "depth ink". |
| Depth Write | toggle | off | |
| Depth Ink | toggle | on | |
| Order in Layer | stepper, −1024…1024 | 0 | Sorts emitters within the effect; higher draws in front. |
| Sort Mode | By Distance (Far First) · By Distance (Near First) · Oldest In Front · Youngest In Front · None (Spawn Order) | By Distance (Far First) | Far First is the alpha-correct painter order; additive blending is order-independent. |
The texture picker — texture slots open a searchable grid of the project's images with a None card ("No texture (procedural shape)") that falls back to the built-in procedural billboard. You can import from the picker (button or drag-and-drop); accepted formats are .png, .jpg, .jpeg, .gif, .webp, .bmp, .svg and .avif. Mesh slots work the same way for .glb, .gltf and mesh .json files.
Limit Velocity over Lifetime
| Field | Control | Default | Notes |
|---|---|---|---|
| Separate Axes | toggle | off | Off: one Speed cap. On: Limit X / Y / Z, each 0–120 units/s. |
| Space | Local · World | Local | — |
| Speed | scalar, 0–120 | curve at 16 | The clamp threshold over lifetime. |
| Dampen | slider 0–1 | 0.5 | How hard speeds above the limit are pulled down. |
| Drag | scalar, 0–12 | 0 | Extra damping applied by this module. |
| Multiply by Size | toggle | off | Scales drag with particle size. |
Inherit Velocity
| Field | Control | Default | Notes |
|---|---|---|---|
| Mode | Initial · Current | Initial | Inherit the emitter's velocity at spawn, or track it continuously. |
| Multiplier | scalar, −4…4 | 0 | Fraction of emitter velocity applied. |
Lifetime by Emitter Speed
| Field | Control | Default | Notes |
|---|---|---|---|
| Speed Range | Min / Max, 0–80 | 0 – 16 | Emitter speeds mapped onto the curve's 0–1 axis. |
| Lifetime Multiplier | scalar, 0–3 | 1 | Scales start lifetime by emitter speed. |
Force over Lifetime
| Field | Control | Default | Notes |
|---|---|---|---|
| Force | vector X/Y/Z, ±160 | 0, 0, 0 | Constant acceleration (units/s²). |
| Randomized | vector X/Y/Z, 0–160 | 0, 0, 0 | Per-particle ± random addition per axis. |
| Multiplier | scalar, −10…10 | 1 | Scales the whole force. |
Color by Speed
| Field | Control | Default | Notes |
|---|---|---|---|
| Speed Range | Min / Max, 0–80 | 0 – 16 | Particle speeds mapped onto the gradient. |
| Color | gradient | white → orange | — |
| Blend | slider 0–1 | 0 | Mix with the particle's lifetime color. |
Size by Speed
| Field | Control | Default | Notes |
|---|---|---|---|
| Speed Range | Min / Max, 0–80 | 0 – 16 | — |
| Size Multiplier | scalar, 0–4 | 1 | — |
| Blend | slider 0–1 | 1 | — |
Rotation by Speed
| Field | Control | Default | Notes |
|---|---|---|---|
| Speed Range | Min / Max, 0–80 | 0 – 16 | — |
| Angular Velocity | scalar, ±24 rad/s | 0 | Note: this module uses rad/s, not degrees. |
| Blend | slider 0–1 | 1 | — |
External Forces
| Field | Control | Default | Notes |
|---|---|---|---|
| Wind | vector X/Y/Z, ±160 | 0, 0, 0 | Constant wind acceleration. |
| Gravity Multiplier | scalar, −4…4 | 1 | — |
| Drag | scalar, 0–12 | 0 | — |
| Vortex Strength | stepper, ±80 rad/s | 0 | Swirl around the emitter. |
Noise
| Field | Control | Default | Notes |
|---|---|---|---|
| Mode | Sine · Curl | Sine | Sine jitters each particle independently. Curl advects everything through one shared, divergence-free turbulence field — nearby particles swirl together. |
| Strength | scalar, 0–8 | 0 | — |
| Frequency | stepper, 0–32 | 1.5 | Cycles per world unit. |
| Speed | stepper, ±16 | 1 | Field animation speed. |
| Scroll | vector X/Y/Z, ±16 | 1, 0, 0 | Field scroll velocity. |
| Octaves | stepper, 1–6 | 2 | — |
| Damping | slider 0–1 | 0.5 | — |
Plane Collision
| Field | Control | Default | Notes |
|---|---|---|---|
| Mode | None · World plane | None | Analytic bounce against a horizontal world plane. |
| Plane Y | stepper, ±100 | 0 | Height of the plane. |
| Radius | stepper, 0–16 | 0 | Particle collision radius. |
| Bounce | slider 0–1 | 0.35 | Restitution; multiple decaying bounces supported. |
| Dampen | slider 0–1 | 0.45 | Tangential speed loss per bounce. |
| Kill Below | stepper, 0–200 | 20 | Kills particles that bounce slower than this. |
Triggers
Named runtime events your game code can listen for. Event names are free-form strings.
| Field | Control | Default | Notes |
|---|---|---|---|
| Birth Event | text | empty | Fired when a particle spawns. |
| Death Event | text | empty | Fired when a particle dies. |
| Normalized Time | slider 0–1 | 1 | A normalized-age crossing that also fires an event. |
| One Shot | toggle | on | Fire once per particle vs. on every crossing. |
Sub Emitters
Three fixed slots — Birth, Collision, and Death — each spawning another effect file from this project:
| Per-slot field | Control | Default |
|---|---|---|
| Effect | dropdown of project effects (or None) | None |
| Probability | slider 0–1 | 1 |
| Inherit Color | toggle | on |
| Inherit Size | toggle | on |
Sub-emitters currently run on the Pixi backend; enabling the module reports a blocker on the Three backend.
Texture Sheet Animation
Flipbook animation over a uniform sprite-sheet grid.
| Field | Control | Default | Notes |
|---|---|---|---|
| Tiles | X / Y, 1–16 each | 1 × 1 | Grid dimensions of the sheet. |
| Start Frame | stepper, 0–255 | 0 | — |
| End Frame | stepper | whole sheet | Clamped to tiles X × Y − 1. |
| Frame over Time | scalar curve, 0–255 | flat 0 | Frame index sampled over lifetime. |
| Cycles | stepper, 0–32 | 1 | Playthroughs per particle lifetime. |
| Random Start | toggle | off | Random start frame per particle. |
Particle History Trails
Per-particle ribbons. Three renders a camera-facing world-space ribbon from particle centers; Pixi renders a screen-space particle-history approximation.
| Field | Control | Default | Notes |
|---|---|---|---|
| Ratio | slider 0–1 | 1 | Fraction of particles that grow trails. |
| Lifetime | scalar, 0–8 s | 0.5 | How long each trail point lives. |
| Length (0 = lifetime) | scalar, 0–12 | 0 | Fixed length cap, or 0 to follow point lifetime. |
| Width | scalar, 0.01–4 | 1 | — |
| Width over Trail | curve | flat 1 | Sampled along the trail: 0 is the head/newest point, 1 the tail/oldest. |
| Min Vertex Distance | slider 0–1 | 0.02 | Minimum spacing between trail points. |
| World Space | toggle | on | Trail points stay behind in world space. |
| Inherit Color | toggle | on | Trail tint follows the particle color. |
| Texture | texture picker | procedural | A dedicated trail texture, or the default. |
| Texture Mode | Stretch · Tile | Stretch | — |
Shader Custom Data
Four per-particle scalar channels (each supporting constant / random / curve, range −1…1) plus a label. When the emitter is bound to a material with a DynamicParameter node, the channels take that node's names and feed it directly — see Materials. Until then the channels are named Param1–Param4. Pixi delivers the channels as one emitter-level representative value; Three evaluates random and curve channels per particle.
Curves and gradients
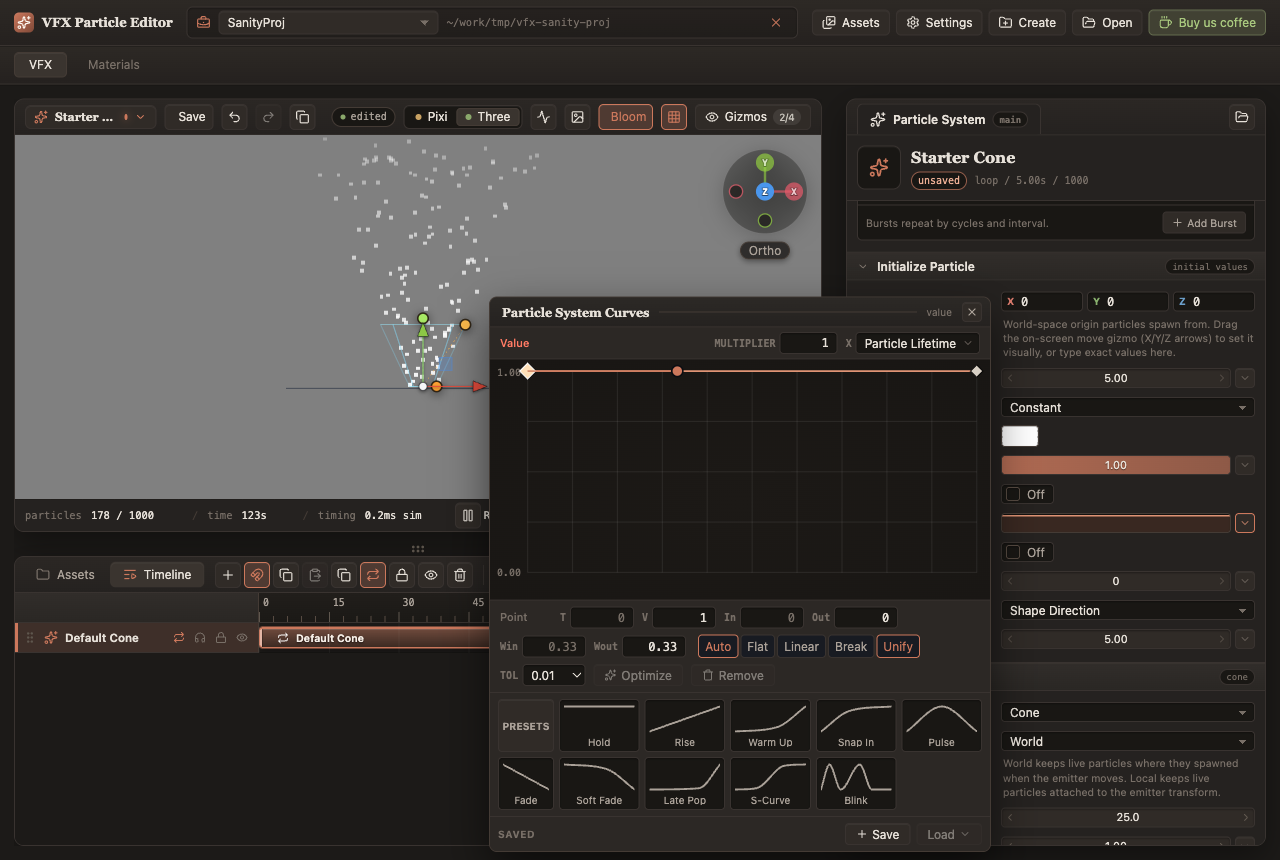
The curve editor
Clicking any curve thumbnail opens Particle System Curves — a draggable floating panel (Escape closes it; its position is remembered). The toolbar shows the value axis with the field's unit, a Multiplier ("Multiplies the graph output after the curve is evaluated"), and the X axis: Particle Lifetime (normalized particle age, the default) or Loop Age (the emitter's normalized loop time). In Random Between Two Curves mode, Curve A / Curve B tabs switch the edited side; both curves stay visible with the band between them filled.
- Add a point — double-click the canvas. Remove — select and press Delete / Backspace, or the Remove button. Curves keep at least 2 and at most 8 points. The first and last points are locked to x = 0 and x = 1.
- Select — click a point; Shift + click toggles; drag on empty canvas draws a marquee. With two or more points selected, a transform box appears with eight scale handles — drag the body to move the group, drag a handle to scale it.
- Tangents — the primary point shows draggable in/out Bezier handles (dragging sets slope and weight together). The point row exposes numeric T, V, In, Out, Win, Wout fields and the tangent mode buttons Auto (shape-preserving), Flat (slope 0 — stops overshoot), Linear (through neighbouring keys), Break (independent sides) and Unify (one symmetric slope).
- Value range — double-click the top or bottom axis label to type a new bound (the top label adjusts the multiplier; the bottom sets the minimum), or use the Curve Range row in the value-mode menu.
- Optimize — simplifies the curve by removing redundant points at the chosen tolerance (Tol 0.001 / 0.005 / 0.01 / 0.025), preserving endpoints and sharp spikes.
- Presets — built-ins Hold, Rise, Warm Up, Snap In, Pulse, Fade, Soft Fade, Late Pop, S-Curve, and Blink, remapped into the field's current range. The Saved row saves and loads your own named presets per project; saving under an existing name overwrites it.
The drawn stroke is sampled by the same runtime curve evaluator the game uses, so what you see is exactly what plays back.
The gradient editor
Gradient swatches (Color over Lifetime, Color by Speed, material Gradient Ramp nodes) open the Gradient floating panel:
- Blend / Fixed — smooth interpolation between stops, or hard stepping where each stop holds until the next.
- Two stop tracks around the gradient bar: alpha stops on top, color stops below. Double-click a track to add a stop; double-click a stop (or use the trash button) to remove it; drag to move. Up to 8 stops of each kind; the last one of a kind cannot be deleted.
- A selected color stop shows its Color, a Location percentage, a duplicate-stop button, and an embedded color picker. A selected alpha stop shows an alpha slider plus a 0–255 value and its Location.
- Presets: White Fade, Ember, Smoke, Magic, Poison, Ice.
The color picker
Color swatches open a compact picker: a saturation/value square, a vertical hue strip, a 6-digit HEX field, and R / G / B inputs (0–255). The picker is RGB-only — alpha is edited through gradient alpha stops or the Initial Alpha field, and HDR brightness through Emissive Intensity.
The timeline
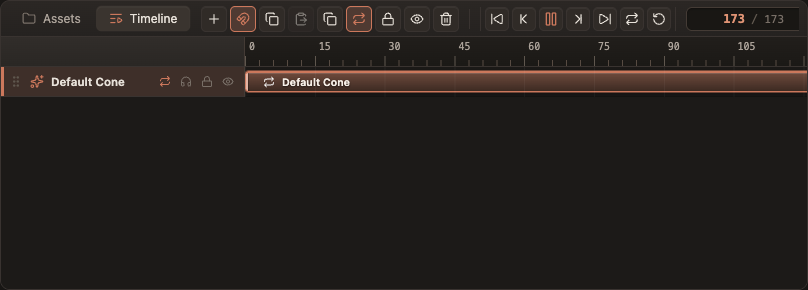
The Timeline tab shows one track per emitter. Clicking a track selects that emitter in the inspector.
Tracks and clips
- Per-track buttons: Loop (emitter looping), Solo (preview only this emitter — an editor-side preview state, not saved into the effect), Lock (protects the track from edits), and Mute (disables the emitter — this one is saved into the effect JSON).
- Drag the clip body to change the emitter's start delay. Drag the left edge to move the start while pinning the end (changes delay and duration). Drag the right edge to change the duration. Dragging past the end of the timeline grows the effect duration. Minimum duration is 0.05 s.
- Double-click a track or clip name to rename inline (Enter commits, Escape cancels). Reorder emitters with Move up / Move down in the context menu.
- Groups — effects whose JSON defines timeline groups show group rows with collapse, group-lock, and group-hide controls (hide toggles every member emitter). The editor does not currently create groups itself.
- Right-click a track for the full context menu: Rename, Copy, Paste, Duplicate, Enable/Disable loop, Lock/Unlock, Mute/Unmute, Solo/Unsolo, Move up/down, Delete. Right-clicking empty space offers Paste at playhead.
Transport and tools
The tab strip hosts a single toolbar row: emitter tools (add emitter at playhead, snap magnet, copy / paste / duplicate, loop, lock, mute, delete), then the transport — jump to start, step back one frame, play/pause, step forward one frame, jump to end, Loop playback range, and Restart effect — followed by the playhead readout, a Frames / Seconds unit toggle, an FPS field (1–240, presets 24, 25, 29.97, 30, 50, 60, 120 — display-only: it changes labels and the snap grid, never playback speed), and zoom controls with a Fit button.
- Scrubbing — drag the ruler or playhead. Seeks are deterministic: scrubbing backward re-simulates from time 0 with the same seed, so the state you land on is exactly what playback would have produced. Scrubbing never reseeds and never toggles play/pause.
- Loop range — with "Loop playback range" on, a bracket appears on the ruler; drag its ends or middle to set the range. Each loop wrap picks a fresh seed unless lock seed is on.
- Snap — the magnet toggles snapping to the frame grid (or the visible seconds grid in Seconds mode); off allows subframe drags.
- Zoom — the slider or Ctrl/Cmd + wheel over the lanes (0.1×–12×).
Preview, camera and backends
Pixi and Three backends
The preview renders through the same nixie-fx runtime
games embed, with two switchable backends. The
Pixi / Three toggle in the viewport toolbar also
sets the effect's target profile, which is saved in the effect
JSON: Pixi ⇒ pixi-ui-2d, Three ⇒
three-world-3d. New effects and all bundled templates
default to three-world-3d. (A third profile,
portable, means "must satisfy both backends"; the
editor previews portable effects through Pixi.)
Each toggle button carries a support dot — supported, partial, or blocked — computed live from the current effect, and the tooltip names the first blocker or warning (for example, mesh particle assets are Three-only, sub-emitters are currently Pixi-only, lit shading warns on Pixi). The same per-backend reports are written into every export.
Camera
| Input | Action |
|---|---|
| Left-drag | Pan |
| Middle-drag | Orbit |
| Wheel | Zoom (0.45×–2.5×) |
| Double-click | Reset view |
Bindings are identical on both backends, and the camera state is remembered per project. The navigation gizmo in the viewport corner shows the current orientation: click an axis ball (+X, −X, +Y, −Y, +Z, −Z) to snap to that view (snapping forces orthographic on), click the center to toggle perspective/orthographic, drag the disc to orbit, or wheel over it to zoom. The camera starts orthographic; the ortho checkbox and the FOV slider (8–65°, perspective only) live in the viewport footer.
Gizmos
The Gizmos menu lists what applies to the selected emitter, each with its own visibility checkbox:
- Shape outlines (Circle / Box / Cone / Sphere / Hemisphere shape) — wireframes with draggable handles that edit the module values directly: radius, box width/height/depth, cone radius/length/angle. Visible by default.
- Move origin — a translate gizmo on the emitter origin with X/Y/Z arrows, plane handles, and a ground-plane center handle. It edits Initialize Particle → Emitter Position. Visible by default.
- Particle pivots and Particle wireframes — per-particle debug overlays (pivot crosses and quad outlines for the selected emitter). Hidden by default.
Preview bloom
The Bloom button opens the preview bloom popover. Bloom is a preview aid only — it is stored in browser storage per project and never saved into effects or exports. Your game applies its own bloom; the editor's exists so HDR emissive values can be judged visually.
| Control | Range | Default | Meaning |
|---|---|---|---|
| Bloom | on / off | on | Master toggle; the sub-label reports live source-particle, pass, and render-scale stats. |
| Threshold | 0–10 | 1 | Minimum HDR brightness that contributes to bloom. |
| Intensity | 0–4 | 4 | Strength of the final bloom add. |
| Exposure | −2…2 | 0 | Preview tonemap exposure in stops. |
| Scatter | 0–1 | 0.7 | How far bloom spreads through the pyramid. |
| High Quality Filtering | on / off | off | Smoother filtering at a higher render cost. |
| Downscale | Quarter · Half | Quarter | Bloom render resolution. |
The reset button restores the balanced defaults above.
Materials and the shader graph
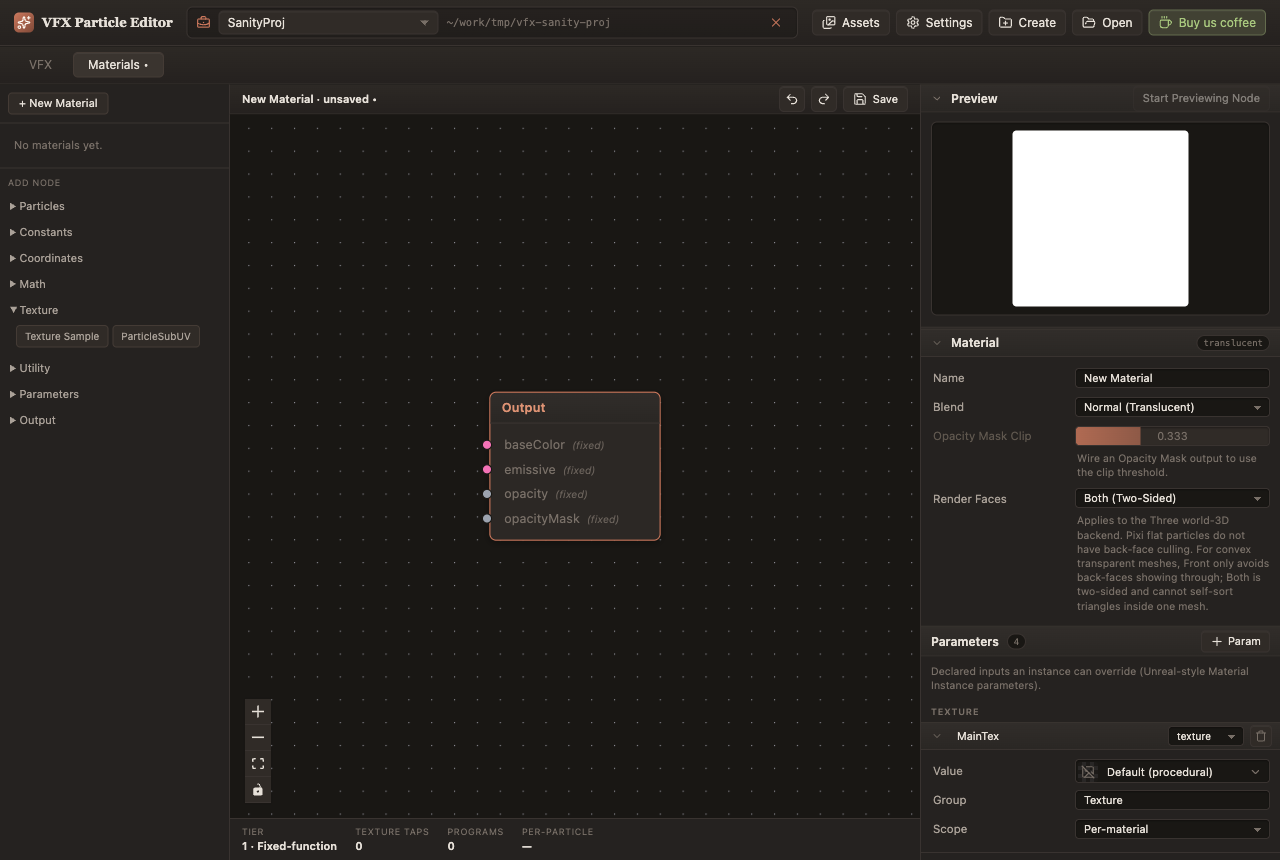
The Materials tool tab is a node-based shader
graph editor in the spirit of Unreal's material editor. A material
is a graph that outputs baseColor,
emissive, opacity, and
opacityMask; any output left unwired shows a
(fixed) tag and falls back to the built-in Sprite Master
fixed-function behavior. Materials are saved as
.material JSON files in the project's materials
folder.
Creating and saving materials
-
+ New Material in the sidebar creates an
in-memory draft; the Assets browser's Create menu and context
menu create the file immediately and open it. Double-clicking a
.materialin the Assets browser opens it too. - New materials seed with the Sprite Master parameter set — MainTex (texture), Tint (color), Emissive (float), and Opacity (float) — plus an Output node.
- Save lives in the graph toolbar (a name prompt appears for unsaved drafts). Work in progress is also auto-preserved per project, so switching tabs or reloading never loses the graph. Note: Ctrl/Cmd + S saves only in the VFX view — in the Materials view use the Save button.
Working the graph
- Add nodes — click a palette entry (drops at the view center), drag it onto the canvas, or right-click empty canvas for a searchable "Add node…" menu.
- Connect — drag from an output pin to an input pin. Inputs take one connection; outputs fan out. Texture pins only connect to texture pins; float and vector types inter-connect freely (floats broadcast). Invalid connections flash the reason (incompatible types, cycles, occupied input).
- Rewire / disconnect — Alt + click a pin breaks its connections; Alt + click an edge deletes it; dragging from a wired input pin picks the wire up to re-drop elsewhere; hold Ctrl/Cmd to grab an existing edge end.
- Edit — Ctrl/Cmd + C / V / D copy, paste and duplicate selected nodes; Delete removes them (the Output node cannot be deleted); undo/redo with Ctrl/Cmd + Z / Ctrl/Cmd + Shift + Z. Pan with middle- or right-drag; left-drag box-selects.
- Previews — the right-hand Preview panel renders the material; select a node and press Start Previewing Node to inspect any intermediate output (with a pin selector for multi-output nodes). Selected nodes with animated inputs also draw a live inline preview, and Noise nodes always show their baked swatch. Right-clicking a Constant offers Promote to Parameter.
Node catalog
Texture-like nodes expose Unreal-style RGB / R / G / B / A output pins; most math nodes have a single Out pin.
| Category | Nodes |
|---|---|
| Particles | Particle Color (RGB/R/G/B/A), Particle Relative Time, Particle Speed, Particle Random, Particle Size, Particle Direction, Particle Position, Particle Macro UV, DynamicParameter (four named channels fed by the Shader Custom Data module) |
| Constants | Constant (Float / Vec2 / Vec3 / Color), Time, Gradient Ramp (full gradient editor on the node) |
| Coordinates | Texture Coordinate, Tiling & Offset, Rotator, Panner |
| Math | Multiply, Add, Subtract, Divide, Lerp, One Minus, Clamp, Step, Smoothstep, Power, Min, Max, Remap, Desaturate, Fresnel (radial), Sphere Mask, Split, Combine, Swizzle, Abs, Frac, Floor, Ceil, Round, Sign, Square Root, Length, Normalize, Dot Product, Sine, Cosine, If |
| Texture | Texture Sample (RGB/R/G/B/A), ParticleSubUV (flipbook-aware sampling) |
| Utility | Noise (Value / Fast Gradient / Perlin Gradient / Simplex / Voronoi, with turbulence, octave levels, tiling, seed, and bake size — baked to textures at compile time), Vector Noise (Cellnoise / Perlin 3D / Perlin Gradient / Perlin Curl / Voronoi), AntialiasedTextureMask, SphericalParticleOpacity |
| Parameters | Parameter (references a declared parameter), Subgraph |
| Output | Output — baseColor, emissive, opacity, opacityMask inputs (always present, one per graph) |
Material settings
| Setting | Options | Notes |
|---|---|---|
| Blend | Normal (Translucent) · Additive · Masked (Cutout) · Opaque | Masked and Opaque are material-authoritative: they override the emitter's blend mode (which then shows "Driven by material."). |
| Opacity Mask Clip | 0–1 | Default 0.333. The cutout threshold; active for Masked blending or when an Opacity Mask output is wired. |
| Render Faces | Both (Two-Sided) · Front Only · Back Only | Applies to the Three backend (Pixi flat particles have no back-face culling). For convex transparent meshes, Front Only avoids back-faces showing through. |
Parameters and material instances
The inspector's Parameters section declares typed
inputs — float, vec2, vec3,
color, texture, bool — with
a display group, a Per-material or Global scope, an optional
slider range (floats), and an optional
Per-particle flag (floats; feeds
DynamicParameter).
An emitter binds a material through the Renderer module's Surface row. What the emitter stores is a material instance: the graph reference plus per-instance parameter overrides and an optional MainTex override — so one graph can drive many emitters with different textures and settings. Overridden rows get a reset button ("Reset to default") that returns them to the graph's live default.
Tiers: how materials run on each backend
The meter strip under the graph reports the compiled Tier, the texture-tap count (warns above 3), the shader program count, and any per-particle inputs:
| Tier | Meaning |
|---|---|
| 0 · Baked | The graph is static per texel and is baked into a texture at author time — free at runtime. |
| 1 · Fixed-function | Resolves to tint / emissive / opacity uniforms and vertex-stage UV animation on the shared sprite shader — unlimited variants at no shader cost. Simple graphs (texture into outputs, the standard Tint/Emissive/Opacity parameters, a Panner or Rotator feeding a texture UV) stay Tier 1. |
| 2 · Uber-shader | Real per-pixel or per-particle math compiled into a dedicated shader program. Triggered by particle nodes, DynamicParameter, per-particle parameters, time-driven UV used outside a texture input, or fragment ops fed by dynamic inputs. Pixi runs Tier 2 through its batched particle path (a few per-particle signals need the mesh path and say so in a diagnostic); Three compiles full shaders. |
| 3 · Deferred | Reserved for node types the runtime cannot render yet; exported as data-only. No node in the current palette produces Tier 3. |
Exporting for games
The inspector's Validation & Export module shows the current effect's validation summary (blockers, errors, warnings) and the Export Game VFX button, which exports the whole project. Right-clicking an effect file in the Assets browser offers a single-effect Export Game VFX as well.
Export writes the project's output folder (default
out/vfx):
out/vfx/
  manifest.json     # effect + asset index, validation status
  effects/*.json    # compiled effects with per-backend support reports
  ...               # byte-copies of every referenced texture/mesh/material
-
Every compiled effect (and its manifest entry) carries a
supportreport per backend —supported,partial, orblocked— with warnings and blockers, so a game can fail fast on effects its renderer cannot honor. -
If validation blocks the export, the editor writes
export-diagnostics.jsoninstead of a bundle and lists the diagnostics in the panel. - The output folder is emptied and rewritten on every export — never keep hand-made files in it.
- The result panel reports the outcome ("Exported N effects to out/vfx.", "…with partial-support warnings.", or "Export blocked for N effects.") with the written files and any diagnostics.
Loading the bundle in a game is covered by the
runtime feature reference and the
Three.js runtime guide: install
nixie-fx with your renderer, load the bundle, and
drive update() from your frame loop.
Keyboard shortcuts
| Keys | Where | Action |
|---|---|---|
| Ctrl/Cmd + S | VFX view | Save the current effect |
| Ctrl/Cmd + Z | VFX view / Materials view | Undo |
| Ctrl/Cmd + Shift + Z or Ctrl/Cmd + Y | VFX view / Materials view | Redo |
| Esc | everywhere | Close the open dialog, popover, or menu |
| Ctrl/Cmd + A / C / V / D | Assets browser | Select all / copy / paste / duplicate |
| F2 | Assets browser | Rename the selected item |
| Delete or Ctrl/Cmd + Backspace | Assets browser | Delete the selection (with confirmation) |
| Arrows, Home / End, PageUp / PageDown, type-ahead | Assets browser file view | Move the cursor; Enter opens, Space selects |
| Ctrl/Cmd + C / V / D, Delete | Material graph | Copy / paste / duplicate / delete nodes |
| Alt + click | Material graph pins and edges | Break connections |
| Delete / Backspace | Curve / gradient editors | Remove selected points or stops |
| Shift (held) | Any drag-scrub number field | Fine control (0.1× sensitivity) |
| Ctrl/Cmd + wheel | Timeline lanes | Zoom the timeline |
| Enter / Esc | Any inline editor | Commit / cancel |
There is no spacebar play/pause and no export shortcut. The save shortcut applies only in the VFX view — materials save with their toolbar button.
Troubleshooting & FAQ
Which browsers does the editor support?
Chromium-based browsers: Chrome, Edge, Arc, Brave, Opera. The editor needs the File System Access API to read and write your project folder; Safari and Firefox do not ship it yet, and the editor shows a notice instead of the launcher there.
Where do my files live? Is anything uploaded?
Everything lives in the project folder you picked — effects as
.json, materials as .material,
exports under out/vfx. Nothing is uploaded. The
browser stores only the project list, per-project UI state
(camera, bloom, panel sizes), and the folder handles it needs to
reopen your projects.
The editor keeps asking for folder permission. Why?
Browsers expire folder permissions periodically. The editor re-requests access when it needs it — for the playground it shows "Folder access needed" and asks again; for regular projects the permission prompt appears when you reopen them. Granting access once per session is normal. If a folder was moved or deleted, pick it again (recent projects keep their identity when you reconnect the folder).
My playground disappeared. What happened?
The playground is a normal folder on disk. If the folder was deleted or emptied, the playground card restarts setup and asks you to pick a new empty folder.
Why is the Blend Mode dropdown grayed out?
The emitter's surface is driven by a material whose blend mode is authoritative ("Driven by material."). Change the blend in the material's inspector, or switch the Surface row back to Texture.
Why does one backend's dot show a warning or blocker?
Some features are backend-specific: prepared 3D mesh particles, mesh-surface emission, and lit shading need the Three backend; sub-emitters currently run on Pixi only; Pixi approximates GPU depth writing with deterministic 2.5D ordering. The dot's tooltip names the first issue, and the Validation & Export panel lists them all. A blocked effect still previews on the other backend and exports with an explicit blocked status.
My export produced only export-diagnostics.json.
Validation blocked the export. Open the effect, check the Validation & Export panel, and fix the listed blockers (for example a mesh render mode with no mesh asset, or a missing texture reference). Note that every export first empties the output folder, so a blocked export leaves only the diagnostics file.
What does "N missing asset refs" in the Assets tab mean?
A saved effect references a texture or mesh path that no longer resolves — usually after a file was moved or renamed outside the editor. Select textures to see their "Referenced by" lists, or re-assign the texture on the affected emitter.
Does the preview match the game exactly?
The preview embeds the same runtime games use, with the same deterministic simulation — same seed, same motion. Preview bloom and the preview background are editor-side aids and are not exported.
Resources
- Open the editor free, browser-based, your files stay local
- Feature reference capability overview of the editor and runtime
- Three.js runtime guide loading exported effects in a Three.js game
- Runtime repository github.com/azakhary/nixie-fx — runtime, CLI, and skills (MIT)
- Agent skills nixie-fx-authoring + nixie-fx-runtime install guide
This manual is maintained by the team behind NixieFX, the browser-based particle editor for PixiJS and Three.js. A machine-readable version is available at /editor-manual.md, and a site index for LLMs at /llms.txt.